Guides
How to create Video & Animations with Sogni
Learn about generating and creating video and animations
Sogni can help you create image sequences that are then converted into a video file with the playback frame rate of your choice. Similar to single images, the resolution of the resulting animation will be 2048x2048 pixels if an upscaler is enabled; otherwise, it will have the original resolution of the Stable Diffusion Model in use, which ranges between 512 and 1024 pixels. You can choose to upscale the video after it has been generated. Disabling automatic upscaling when generating animations can improve performance.
To create an animation, simply follow these steps:
Step One
Enable Animation Mode by clicking on the Animation button located at the top bar of the Control Panel.
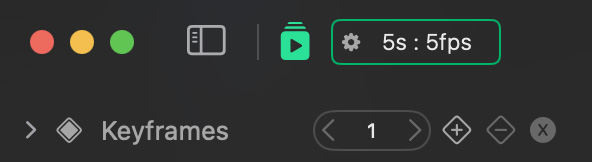
Step Two
Click the Keyframe settings and select the desired duration and frame rate for the animation.

Step Three
Adjust all settings as if you were generating a single image: prompt, style, seed, steps, guidance, etc.
Step Four
If desired, add a Guide Image or video. If you add a video, it will be imported with the same duration and frame rate as you have selected for the animation. You should re-import the video after adjusting length and frame rate settings.
Step Five
If desired, add a ControlNet reference image or video and select a ControlNet model.
Step Six
Add keyframes to control the progress of your animation. You can use keyframes to adjust any of the generation settings on a timeline, control camera movements, etc. The Keyframes module is accessible only when Animation mode is enabled. For more information, refer to the 'Help' dialog within the Keyframes tab.
Step Seven
Save your project
Relevant Features:
You can pause the generation process at any moment. Sogni will generate a video from the available frames for you to review. You can add the video to the gallery and/or adjust any settings before continuing the generation process.
Most settings can be edited while the animation batch generation is running (unless keyframes are in use), without the need to pause it. You can make real-time adjustments to any value, edit prompts, and more.
To stop the generation process, you can either cancel it and discard the generated content, or you can pause it and then use the Stop button.
You can restore a previously generated video from the gallery, set the animation batch as paused, and generate more frames to extend the video's duration.
You can restore the settings of images saved in the Gallery to the selected keyframe.
Tips:
When using a guide image with a high Strength value, it is advisable to use a random seed to prevent image degradation. Switching to a different scheduler can also have a positive effect if image degradation becomes an issue.
Enable Automatic Image Guide and ControlNet when using single images as a reference. By doing so, every new frame will be generated using the previous one as a reference, resulting in more controllable animations. Lock the seed for smoother animations or shuffle it to increase randomness.
Keyframes Help
Keyframes define the start and end points of animation actions. These markers are identified by a diamond symbol ◈.
Use keyframes to control the following settings during your animation:
- Prompt
- Style
- Avoid Prompt
- Seed
- Steps
- Guidance
- Guide Image
- ControlNet Image and Preprocessors
- Camera Controls
- Scheduler & Time Spacing
Settings Not Supporting Keyframes:
- Upscaling Model
- Stable Diffusion Model
- Processing Units
Note: To change these settings at a specific point in your animation, use the generation "Pause" feature.
Interpolation
Some settings support interpolation, meaning their value will adjust progressively from one keyframe to the next.
Settings supporting interpolation:
- Steps
- Guidance
- Guide Image Strength
- Guide Image Camera (Zoom, Panning, Roll)
- ControlNet Camera (Zoom, Panning, Roll)
These settings feature an additional Enable/Disable button, identified by a keyframe symbol ◈. Disabling the keyframe for a setting means its value will be ignored, allowing you to place extra keyframes between the two main keyframes that control the interpolation of the setting without affecting it. This is particularly useful for animating camera zoom, panning and roll with different timings, for example.
The Keyframes Timeline
The timeline represents the animation's progress over time, dictated by the total number of frames. This is calculated from your animation's total duration and frame rate settings and is indicated by a vertical line on the timeline.
Timeline zoom controls allow you to expand or contract the view, helping you focus on specific sections.
The total length of the generated animation will be the minimum of these three values:
- Total duration and frame rate settings (vertical line)
- Guide Image video length, if used (small red marker)
- ControlNet video length, if used (small red marker)

Need help? Ask in our Discord!
For any questions regarding the use of Sogni, tips, suggestions, bugs, sharing art, discussing AI and life, or simply hanging out, please feel free to join our Discord today!